
Leica Summicron 28 on the Sony NEX-7. Corrected for colour shifts.
Since digital was a continuation of technological advances based on analogue camera designs, sensors have been developed to behave as closely as possible to the gelatine coated plastic slivers of film predating it. This approach had many advantages of course – a lot of previous inventions could be continued to be used, as well as existing lenses and lens designs. Because of this most lenses designed for film works digital sensors with expected performance.
There are exceptions however.
Leica Summicron 28 on the Sony NEX-7. Corrected for colour shifts.
While film gathers light evenly, current sensors rely on micro lenses directing light down into narrow paths, called pixel wells, at the bottom of which are the actual light sensing material. When light arrives to the tiny micro lens, it is focused down to the sensing material, ensuring that as much as possible of the light is captured – quite clever.
If light arrives to the micro lens with a steep angle however, issues can arise. Light rays can become bent in unforeseen ways, not reaching the bottom of the pixel well, dropping into the adjacent pixel well or even bouncing back away from the sensor. This can show up in the resulting images as a stronger than expected vignetting, as well as colour cross talk and colour shifts – a distortion of colour reproduction.
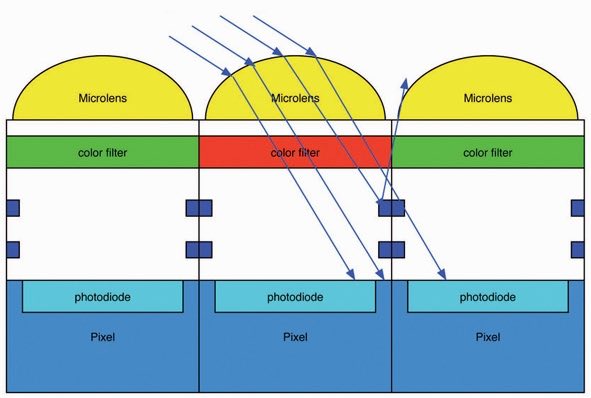
Illustration of unexpected ray behavoiur Source – Leica

Voigtländer 15 on the Leica M9. Corrected for colour shifts and vignetting.
In extreme cases it can even lead to smearing – a loss of detail and definition. This is the most destructive of the issues and most often due to refraction induced by the additional surfaces in front of the micro lenses (i.e. the sensor cover glass itself acting as a lens element).
Since ray angles are generally linear at the image centre these issues mainly affect the outer zones of an image – the edges and corners.

Voigtländer 35/2.5 on the Sony NEX-7. Corrected for colour shifts. Note corner smearing.
Most SLR lens designs are telecentric to clear the mirror housing, with light rays coming out of the lens perpendicular to the sensor, not resulting in any issues. Lenses designed as compact wide angle lenses for short register distances on the other hand, are often designed in a way which results in oblique ray angles. This includes many rangefinder lenses.
This might explains why it’s taken a while for the wider discovery these issues, as well as what work arounds are available – most people seemingly used D-SLR:s or compacts up until a few years ago. As people started using compact, legacy lenses on the new, mirrorless systems performance was at times not as expected.
Aside from the lens characteristics, a number of sensor design choices also affect the extent of issues. Micro lens shape, pixel well depth as well as the thickness and refractive qualities of the sensor cover glass can help reduce or enhance the issues.
Since the effects are specific depending on sensor design, one needs to examine a given combination, rather than generalising per lens or per camera.
While unwelcome, one can work around these issues in many cases. Either through choices made at the time of capture, or through a few simple post-processing steps.

Leica Summicron 28 on the Sony NEX-7. Corrected for colour shifts.
Vignetting is not specifically connected to oblique ray angles but can be induced or worsened by them. Since it’s a common issue most processing software have simple tools for correcting it. Removing vignetting effectively pushes ISO in the affected areas, in turn increasing noise. It’s therefore advisable to maximise exposure at time of capture for optimal results.

Leica Summicron 28 on the Sony NEX-7. Corrected for colour shifts and vignetting.
While problematic and difficult to correct for a few years ago, the advent of new software tools has made this easy overcome today. CornerFix is a free and standalone application. Adobe offers a plug-in for Lightroom called DNG Flat Field. Both work equally well and in a similar way. I prefer Adobe’s option since it’s integrated in Lightroom.
To correct colour shifts you need to have a calibration image. The purpose of the calibration image is to clearly pinpoint the shifts in the specific camera/lens combination. The software then applies corrections in the opposite direction – cancelling the colour shifts and optionally also vignetting.
Creating calibration images is a simple task. All that’s needed is a photo of an evenly coloured, neutral surface with the camera/lens combination you want to correct. It's important to use the specific combination that you want to correct for, since differences can be large between cameras.

Example calibration image — Voigtländer 15 at f/4.5 on the NEX-7.

Example calibration image — Voigtländer 15 at f/4.5 on the M9.
The best method I’ve found for making calibration images is to use my laptop screen with a dark grey full screen image and brightness turned down. I want to get a slightly longer exposure. During the exposure I move the camera around slightly to avoid any unevenness in the calibration image.
Some suggest creating a calibration image for each f-stop and even for different lighting conditions. I’ve found that approach excessive and usually only create two. One wide open and focus at infinity, the other well stopped down and with focus at the closest point. This represents a worst case / best case for the colour shifts. When correcting I then choose the calibration image closest to the circumstances in the shot. This works very well and from my experience completely eliminate the shifts.
Since the corrections work by increasing the exposure in specific channels noise can increase, especially unattractive colour noise. Therefore it’s again advisable to maximise exposure at time of capture.

Voigtländer 15 on the M9 – Uncorrected.

Voigtländer 15 on the M9 – Corrected using calibration image.
The only issue that I personally pay attention to since it can’t be corrected. It can render a lens that’s excellent on one camera average or even poor on another.
It can be a bit tricky to pin down since it usually depends on both aperture and focal distance. My general experience is that smearing is a larger problem at infinity than at closer distances.
Field curvature characteristics can also change, making a lens again behave unexpectedly. I’ve seen severe curvature both away and towards the camera due to astigmatism induced smearing.

Leica Summicron 28 on Sony NEX-7 at f/2 or f/2.8. Edge crop demonstrates smearing.


Same Summicron 28 on Leica M9 in a similar situation. Note the significant difference in resolution and definition.
Stopping down generally decreases smearing, in many cases eliminating it completely. With some lenses a single stop is enough to bring performance back to good levels. In other lenses so much stopping down is needed that it makes the lens unusable in all but the best light.
The worst offenders here are honestly best avoided, the performance is simply too poor. However even a combination with some issues here can be an excellent performer, given that the smearing isn’t extensive and that it improves stopping down. It’s important to get to know a camera/lens combination – to understand what focal distance and aperture combinations to avoid to get good results.


Leica Summicron-C 40 on Sony A7 - f/2. A poor combination in practice. Note smearing and unexpected field curvature behaviour. This corner crop shows the extreme distortion of the field with the far background begining to come into focus.
Worth noting is that these aren’t unique issues to adapted lenses. Despite having sensors specifically designed to handle these issues – with thin sensor cover glass and optimised micro lenses – Leica’s digital bodies too suffer from these problems. They handle it by applying corresponding corrections for their own lenses directly in camera – lenses either identified by their so called 6-bit coding or manually through the menus (note that sometimes a suitable correction profile can be found also for third party lenses, by choosing a closely specced Leica lens).
Other manufacturers also do it. Most often correcting vignetting and distortion, but also other issues – Sony for instance, corrects for colour shifts for their FE35 as well as other lenses. So problems mainly arise when using third party lenses on Leicas or when adapting lenses to another system. Corrections then needs to be made in the post-processing stage, rather than in camera. As mentioned above, smearing can’t be corrected – in camera or otherwise.

The bottom line is to not be discouraged if a lens shows some ray angle issues on a camera you want to use it on. It’s quite possible that the issues can be worked around fairly easily and there are some truly excellent options available. I've shot many of my favourite photos using combinations troubled by colour shifts. The only thing I’d recommend against is using a lens/camera combination that results in excessive smearing – it’s simply not worth the effort with so much excellent gear available.
Exif-data is intact of the photos. Open any image in a new window for a closer look.